
As those of you who have been loyal readers know, Mr. Sthole and I moved not too long ago. If you’ve ever moved before, you know that after the move, you have more boxes then you know what to do with. Here is a *link* to 15 toys you can make from boxes that are entertaining and budget friendly. And here are some tutorials below to get your started!
Cardboard Slide:
Materials: Giant Cardboard Box, Pencil, Ruler, X-Acto Knife, Butcher Paper
, White Tape, Scissors, Red Paint, Paint Brush
Step 1: Design the structure of your lemonade stand, draw it onto the cardboard box, and then cut it out with an X-acto knife. We cut a window into the front of the box and doors into the side. We used the extra cardboard from the window to make a shelf that would hold the lemonade. We also cut off the top of the box in a diagonal so that a paper awning would sit on a slope.
Step 2: Cover the box in butcher paper. We attached it with white tape so the seams wouldn’t be as noticeable.
Step 3: Inside the box, brace the shelf that sits in the front window with extra strips of cardboard. We taped them diagonally and horizontally so they wouldn’t budge.
Step 4: To make the striped awning, first measure the sides of the box top. Draw these dimensions onto a piece of butcher paper, making sure to leave a few extra inches for the scalloped edge that will hang over the top of the box. Measure and draw the stripes so they’re all of equal length, then paint every other one with red paint.
Step 5: Add any other decorations (painted stripes, price sign, etc.)
Step 6: Bring outside to the sidewalk and start selling!
Cardboard Easel:
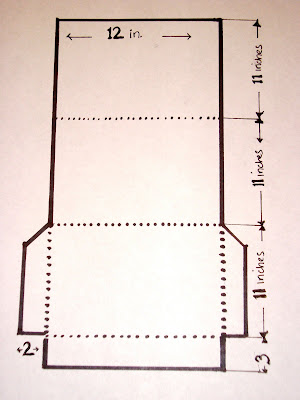
Start by copying my drawn image onto a piece of cardboard in pencil.
-Using an x-acto knife and straight edge, cut along the black lines and score along the dotted lines.
-Fold along all scored sides and tape securely…I love white duct tape.
Cardboard Guitar:
- Trace a little ukelele to use as a pattern for these little guitars. If you don’t have a ukelele you can find a pattern *here*.
- Next, check out in your garage (or storage space) for some sturdy cardboard. Try and find some without folds or creases. I got mine while at Staples, and just asked for some of their old boxes. Ask at your local store (any kind) and see if they are getting rid of any. You may find some higher quality cardboard there, rather than old squished boxes you may have laying around.
- Then trace 3 of the full size guitar shape right onto the cardboard. Then cut off the top part of the guitar, right along the dotted line, and trace 2 of the shortened guitar piece (without the center hole) onto the cardboard as well.
- Then use a utility (or exacto) knife to cut out the 5 guitar shapes.
- Then, use a hot glue gun to attach two of the bigger guitar pieces together.
- Next, cut up a pencil (or wooden dowel) to create a bridge at each end of the guitar strings. Cut a piece that is 1 1/2 inches and the other one 2 3/4 inches.
- Then, draw a 2 3/4 inch line that is 1 inch below the circle opening on the front side of the 2 guitar pieces that you just glued together. Then draw 4 dots below the line that are about a 1/2 inch apart and about a 1/3 inch below the line.
- Then use a utility knife to make a shallow cut into the cardboard, right along that line.
- Then use your finger to push a dent down along that line, to create a little divot for the pencil bridge to lay.
- Then hot glue the bigger pencil piece right down into the dented crease, securing the bottom bridge in place.
- Next, drill some holes through the 2 layers of cardboard, right where your 4 marks are.
- For the bridge at the top of the guitar neck, make a 1 1/2 inch long line right below where the neck curves out at the top. Then make 4 dots about a 1/2 inch above the line, about a 1/3 inch apart. Make a shallow cut along the line, dent it in with your finger, and then hot glue the smaller pencil piece right into the crease……..just like you did above.
- Now, use your utility knife to cut out little dents in the pencil, to help keep each of the guitar strings in place.
- For the guitar strings, I found some colored file folder rubber bands at Staples. They are jumbo size (7 inch rubber bands) and are the perfect size to use for this project. I cut 4 rubber bands open for the guitar.
- Then, tie one end of each of the rubber bands along the long edge of a sturdy 1 inch (or similar) paper clip.
- From the back side of the guitar, thread each of the other ends of the rubber bands through the 4 holes at the top of the guitar neck……..and pull them all the way through until the paper clip is flush with the backside of the guitar.
- Then, one rubber band at a time, pull them along the front of the guitar and through the drilled holes towards the bottom of the guitar. Tie the other end of each rubber band to a 1 1/2 inch (or similar) paper clip that is on the back side of the guitar.
- Tie each rubber band at different tightnesses, so that each string would sound slightly different, but that detail is up to you. Either way, thread each rubber band through each hole and tie into a knot along the long end of the paper clip. (This is the view from the back of the guitar.)
- Then trim off each rubber band but don’t cut it too close to the paper clip. Then place a bit of glue on the other long edge of the paper clip, just to secure it down. But don’t let the hot glue touch the rubber band or it will melt it and break it.
- Then, place a good amount of glue along the backside of the guitar with the strings (but don’t get any glue on the rubber bands) and then place the 3rd full size guitar piece onto the back……covering everything up.
- Then glue the 2 smaller guitar pieces to the very back of the guitar……giving the guitar more thickness and durability……plus it gives the body of the guitar that fullness like a real one has.
- Press the layers together firmly.
- Then glue the 2 smaller guitar pieces to the very back of the guitar……giving the guitar more thickness and durability……plus it gives the body of the guitar that fullness like a real one has.
- Press the layers together firmly.
Leave a Reply